
3PL Warehouse Layouts: Best Practices
A 3PL layout works best when it cuts travel, keeps storage at about 80%–85%, and leaves room for returns, kitting, and client changes without choking pick flow.
If I had to sum up the article in plain English, it comes down to this: pick the right flow pattern, slot fast movers near pack-out, use vertical space, separate work zones, and track hard numbers like cycle time, accuracy, and cost per order. Those choices matter because travel can eat up as much as 50% of picking cost, and warehouse space in the U.S. runs about $9 per square foot.
Here’s the full takeaway up front:
-
Use the right building flow
- U-shaped for shared inbound and outbound labor
- I-shaped for straight-through movement
- L-shaped when the site forces a corner setup
-
Slot inventory by speed and order pattern
- Put fast movers close to packing
- Recheck ABC slots every quarter or after big SKU shifts
- Keep “A” items in easy-reach pick zones
-
Get more from the same footprint
- Use rack height before adding floor space
- Match aisle width to lift equipment
- Use dense rack types for slower pallet stock, not high-touch items
-
Split up work that causes traffic
- Keep forward pick, reserve storage, returns, staging, and VAS in separate zones
- Place outbound staging near docks
- Keep replenishment from crossing active pick lanes
-
Set up workstations for speed and fewer errors
- Keep supplies within arm’s reach
- Build pack and dock space for peak demand, not average days
- Aim for 70%–80% dock use in receiving and 80%–90% in shipping
-
Test before rolling out building-wide
- Start with a pilot zone or top 50 SKUs
- Watch lines per hour, travel time, error rate, and labor per order
- Treat 99%+ location accuracy as a strong target
A simple way to think about it: good 3PL layout design is not just about fitting more pallets. It’s about moving orders with fewer steps, less waiting, and fewer conflicts across mixed client needs.
- U-Shaped Layout: Best for operations that benefit from shared labor and close coordination between receiving and shipping activities; the primary tradeoff is the potential for dock congestion during peak inbound and outbound periods
- I-Shaped Layout: Ideal for facilities focused on straight-line product flow and cross-docking efficiency; however, it requires docks on opposite sides of the building, which may limit site options
- L-Shaped Layout: Well-suited for facilities constrained by site limitations or irregular property shapes; the main drawbacks are potential bottlenecks at corner transitions and less efficient use of floor space
If you want better throughput without adding space or labor right away, this is where I’d start.
Data-Driven Warehouse Design for Scalable 3PL RFPs | Vivek Sander | Conf42 Golang 2026
sbb-itb-eafa320
Choose a flow pattern that fits receiving, storage, picking, and shipping
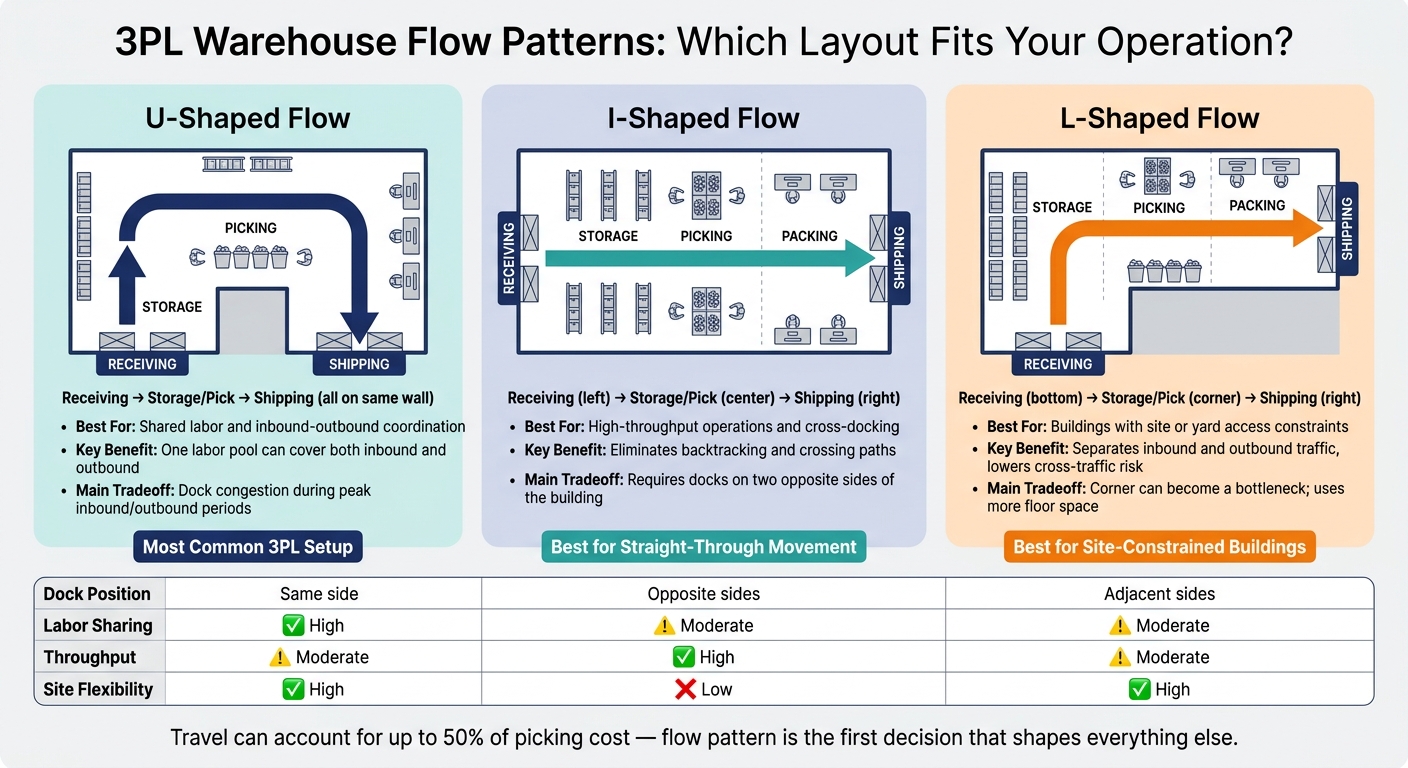
3PL Warehouse Layout Types: U-Shaped vs I-Shaped vs L-Shaped
Flow pattern sets the tone for the whole facility. It affects dock placement, replenishment routes, forklift travel, and staging areas. It also has a big effect on how well the building uses floor space by cutting travel while keeping more area usable. Once you lock in the flow, the rest of the layout gets much easier to shape around it.
There are three main options: U-shaped, I-shaped, and L-shaped. Each one comes with its own tradeoffs.
U-shaped flow for shared labor and inbound-outbound coordination
The U-shaped layout is the most common setup for 3PL facilities. Receiving and shipping docks are on the same side of the building, and product moves in a horseshoe path through storage and picking before coming back out. Because inbound and outbound stay close together, one labor pool can often cover both, with less travel between tasks.
The catch is congestion. When inbound and outbound peak at the same time, dock areas can get crowded fast. That’s why tight scheduling and a clear split between receiving bays and shipping bays matter so much. Without that separation, inbound pallets and outbound orders start fighting for the same space.
I-shaped and L-shaped flow for straight movement or site constraints
The I-shaped layout moves product in a straight line, with receiving on one end and shipping on the other. It cuts backtracking and avoids crossing paths. That makes it a strong fit for high-throughput operations and cross-docking. The downside is pretty plain: you need docks on two opposite sides of the building, which can mean more equipment and less direct supervision across the facility.
The L-shaped layout puts receiving and shipping on adjacent sides at a 90-degree angle. It’s usually the fallback when the building footprint or yard access leaves no better choice. It separates inbound and outbound traffic and lowers cross-traffic risk. But the corner can turn into a bottleneck, and this setup often takes more floor space.
Use U-shaped flow when shared labor is the priority, I-shaped when straight-through movement matters most, and L-shaped when the site pushes you into a corner layout. After flow, slotting determines how much space the design actually saves.
Use slotting and space design to increase capacity without slowing fulfillment
Once the flow pattern is in place, slotting and space design decide how much volume the building can handle. Slotting also cuts travel, which makes it one of the biggest levers for freeing up capacity without adding labor.
ABC slotting and velocity-based placement near pack-out zones
Fast movers still tend to follow the 80/20 rule: 20% of SKUs typically drive 80% of total picks. That’s why ABC slotting works so well. Put the fastest-moving SKUs closest to pack-out, and place slower items farther away.
“A” items should live in the prime pick zone, usually between knee and shoulder height, and as close to packing stations as possible. “B” items can go in secondary pick faces. “C” items belong in farther rack locations or higher rack levels, where slower access won’t drag down throughput.
For 3PLs, velocity alone isn’t enough. Slotting also needs to reflect:
- Order profiles
- Seasonal demand shifts
- Case-versus-each handling patterns
- Client revenue contribution
Reclassify ABC slots every quarter, or after major SKU changes, so fast movers stay near pack-out.
After placement, the next gain comes from using rack height and aisle width better.
Vertical storage, aisle width, and high-density racking decisions
Use the full ceiling height before taking more floor space. Vertical racking can add up to 40% more storage capacity in some facilities, and ASRS can store inventory more than 40 feet high.
Aisle width should fit the equipment used in each zone. A simple rule of thumb looks like this:
- 6–7 feet for pallet jacks
- 8–10 feet for reach trucks
- 12–13 feet for counterbalance forklifts
- 5–7 feet for turret trucks
The payoff can be big. Moving from wide aisles to narrow-aisle reach trucks can recover 20% to 25% of floor space, while very narrow aisle (VNA) turret trucks can recover 40% to 50%. Double-deep racking can improve storage density by 30% to 40% versus standard selective racking. Pallet flow racking can reach 80% space use while keeping automatic FIFO rotation.
The trick is simple: match the rack type to SKU turnover. Dense rack layouts work well for slower, pallet-based storage, but they can become a headache for items that need frequent, individual access.
Once storage density is set, the next step is to separate work that shouldn’t compete for the same space.
Zone planning for storage, returns, and value-added services
Clear functional zones help keep one workflow from tripping over another. Forward pick areas, often carton flow or shelving stocked with broken-case inventory, should sit close to packing stations. Reserve storage for full pallets belongs farther from pack-out in high-density vertical racking.
Returns inspection needs its own isolated area with controlled access so nonconforming inventory doesn’t slip back into active pick stock. If a 3PL also handles pick and pack, kitting and assembly, testing, or white glove work, the layout should include dedicated space for those services too, without clogging dockside flow.
Mezzanines can put VAS above ground-level operations and add up to 40% more usable area without expanding the footprint.
Cut travel time, bottlenecks, and handling errors in daily operations
With storage zones in place and slotting dialed in, the next job is making sure people and equipment can move through those zones without getting in each other's way. A layout can look good on paper and still bog down fast if movement rules are loose. Storage matters, but day-to-day flow inside active work areas matters just as much.
Picking paths, replenishment routes, and congestion control
After inventory is slotted, daily movement patterns decide whether the layout works the way it should. One of the most common choke points shows up when replenishment traffic cuts across active pick lanes. If a forklift restocking reserve locations has to use the same aisle as a picker, both jobs slow down. A better setup is to give replenishment its own route behind or alongside active pick faces, then handle heavier restocking during off-peak windows when picking volume drops.
In busy aisles, one-way traffic can make a big difference. It lowers collision risk and makes movement easier to read at a glance. Floor markings, color-coded zones, arrows, and marked equipment parking spots help remove guesswork.
Staging placement matters too. If outbound freight has to cross active work areas, pick lanes can back up in a hurry. Put staging near loading docks so freight can move out cleanly. Flexible staging areas arranged by carrier, route, or priority help the facility handle outbound surges without pushing freight into pick aisles or blocking dock doors.
Packing, staging, and workstation placement
The same idea carries over to the workstation. Pack station setup affects both speed and accuracy. Keep cartons, dunnage, scanners, printers, and labels within arm's reach so workers don't waste motion or make extra handling mistakes. Lift points should sit between knee and chest height to help cut fatigue.
Build stations for peak volume, not average volume. Use this capacity formula:
Required Capacity = (Average Daily Volume × Peak Factor) / (Available Hours × Efficiency Rate)
For dock use, aim for 70–80% utilization in receiving and 80–90% in shipping. Those targets give you a clear read on whether pack and dock space line up with demand.
Test the layout, track the right metrics, and update it as needed
Once the layout is built, the work changes. Now you need to prove it under day-to-day demand.
A layout that works on day one can lose steam over time if no one checks it. Client accounts change. SKU mix changes. Order patterns change too. The layouts that keep working are the ones backed by steady review of earlier choices - flow, slotting, and zone design - not a one-time design call.
Validate the layout before full rollout
Start small. Pilot the redesign in one zone, then compare lines per hour, error rates, and travel time against the baseline.
A practical first move is to convert the top 50 SKUs into a reworked forward pick area with updated labels and new paths. Pilots like this often show pick productivity gains of 10%–20% before any site-wide changes happen.
Don’t stop at the plan on paper. Walk the route on the floor. Simulation can miss turning space and ergonomic limits. Use WMS or spreadsheet-based simulation tools to test routing options before making physical changes. Then get feedback from floor staff during the pilot. They’ll spot issues a blueprint won’t show.
When the pilot performs well, scale it in phases. Use short freeze windows for large inventory moves so shipping commitments stay intact. Then use the pilot results to lock in the baseline for later measurement.
Measure results with cycle time, accuracy, utilization, and cost per order
After the changes go live, the numbers show whether they worked.
The main KPIs to track are:
- order cycle time
- pick accuracy
- dock-to-stock time
- labor hours per order
- space utilization
- cost per order
For accuracy, location accuracy above 99% is a solid target with scanning and on-device validations. It also helps to track average travel distance per pick, since that can flag slotting drift early.
Conclusion: the best 3PL layouts balance flow, capacity, and flexibility
Once those metrics are in place, you can tune the layout instead of starting over. Set review triggers - quarterly, monthly during peak season, or after a 20% SKU-velocity shift - so the layout stays aligned with demand.
FAQs
How do I choose the best warehouse flow pattern?
Choose the warehouse flow pattern that fits your operation, your space, and the way products move through the building. A good place to start is by mapping four things: inbound, internal replenishment, outbound, and exception handling.
For high-volume operations, U-shaped and I-shaped layouts are often a strong fit. It also helps to plan for automation and velocity-based SKU placement, so fast-moving items sit close to packing.
The aim is simple: move goods from receiving to shipping as smoothly as possible, with less backtracking, fewer crossings, and less congestion.
When should I re-slot inventory?
Re-slot inventory on a regular schedule to keep the warehouse running smoothly, especially in a 3PL setting.
Take a close look at high-velocity SKUs at least once a month during peak seasons or any time demand starts to shift, like during promotions or after new product launches. That helps you keep fast-moving items in the easiest-to-reach locations instead of letting yesterday’s layout slow down today’s work.
Quarterly reviews matter too. They help you adjust for seasonal swings, product lifecycle changes, and shifts in what customers are buying. In practice, it often works best to re-slot more often before busy periods so high-demand items are easier to access. Then, during slower periods, you can make bigger layout changes with less disruption to daily operations.
What KPIs matter most after a layout change?
The most important KPIs after a layout change are the ones that show how well the operation is working day to day. In plain terms, you want to track whether the new setup helps people move faster, make fewer mistakes, and use space better.
That usually means watching metrics like:
- dock-to-stock time
- pick rate
- cycle time
- order accuracy
- space utilization
- labor productivity
These numbers tell you if the new layout is doing its job or just shifting problems from one area to another.
Related Blog Posts
Related Articles
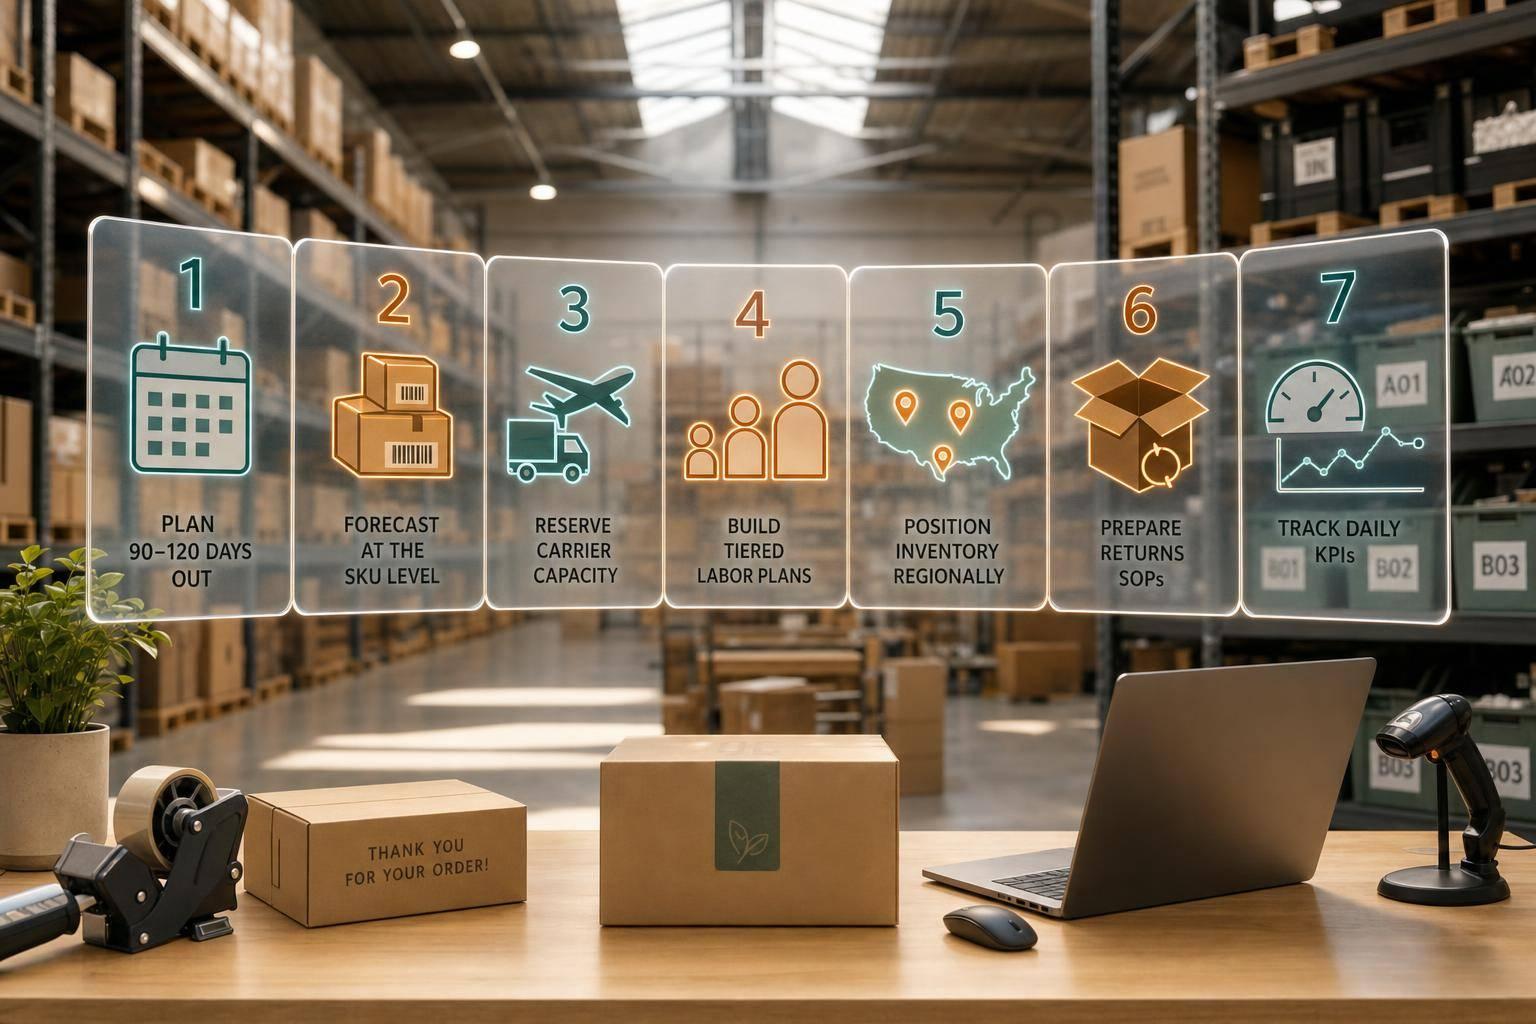
7 3PL Peak Season Planning Tips for DTC Brands

How 3PLs Solve Urban Delivery Constraints
