3PL Custom Packaging for E-commerce Orders
If your 3PL custom packaging process is not locked into the WMS, errors grow as order volume grows. I’d sum it up like this: define every packaging part, tie each order type to fixed pack rules, control inbound packaging stock, check each pack before seal, and test the setup before full launch.
Here’s the short version in plain English:
- Set every packaging item as its own SKU: boxes, inserts, tape, labels, and dunnage
- Create fixed pack profiles by order type: standard, gift, promo, fragile, influencer, premium
- Use version control for seasonal or campaign packaging so old stock does not get used by mistake
- Show packers photo SOPs with exact product placement, insert position, tape points, and label location
- Route orders by pack complexity so custom jobs do not slow standard waves
- Control receiving with ASNs, scan checks, count checks, damage checks, and version checks
- Set min/max station stock levels and use scan-based replenishment
- Verify each order before release with SKU scans, packaging scans, weight checks, and visual checks
- Send failed packs to rework and track metrics like accuracy rate, first-pass yield, and exception rate
- Pilot the process before go-live across 3–5 core SKUs, 2–3 packers, and 50–200 orders per setup
- Hold launch changes until the pilot hits 99.5%+ accuracy
What matters most? Custom packaging is not just about how the box looks. It changes inventory control, labor flow, QA, training, and reship cost. If you want branded fulfillment that stays consistent at 100+ orders per day and still holds during peak, the process has to be written, scanned, checked, and locked.
I’d use this article as a simple playbook for building that process inside a U.S. 3PL.
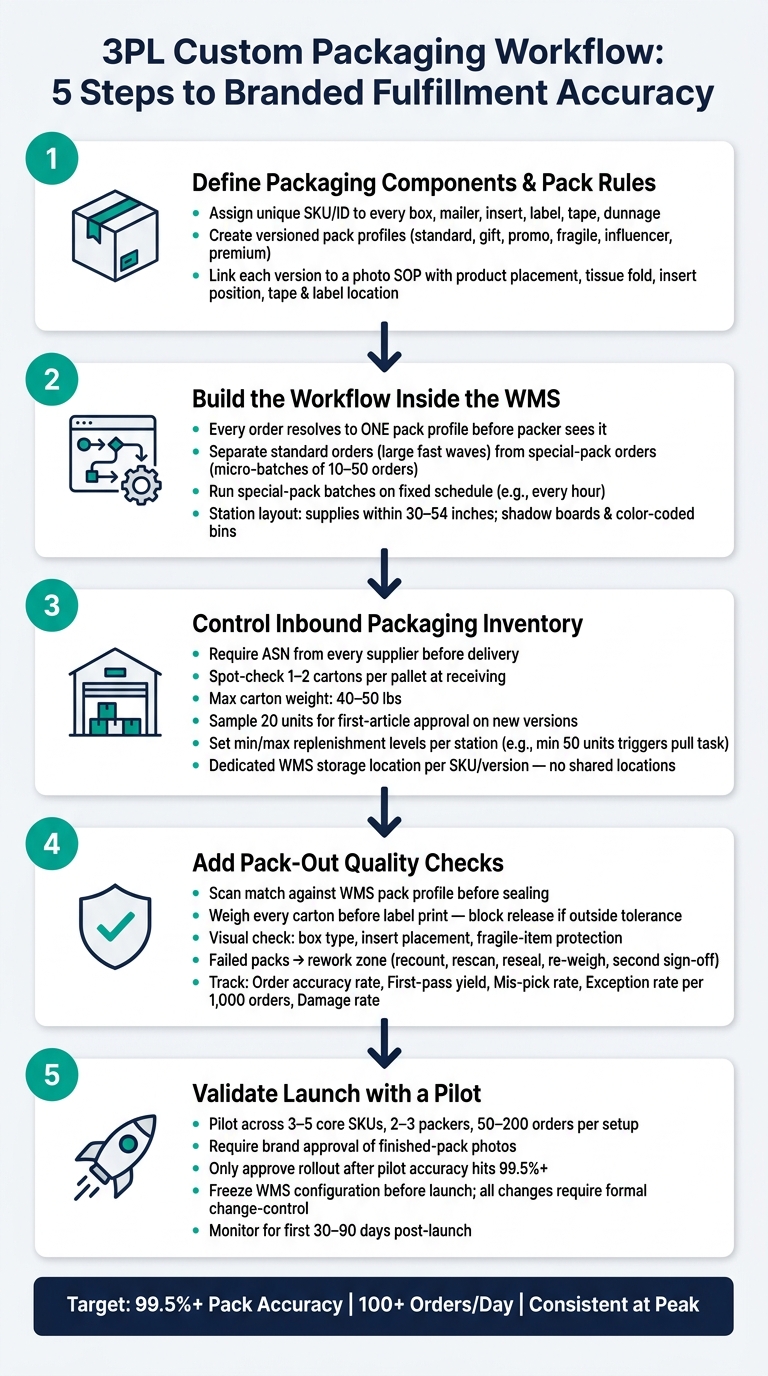
3PL Custom Packaging Workflow: 5-Step Process for E-commerce Accuracy
How a 3PL Works [E-commerce Fulfillment Process Explained]
sbb-itb-eafa320
1. Define packaging components and pack rules
Treat each packaging material as a WMS-controlled item. That means every box, mailer, insert, label, tape, and dunnage SKU should have its own part ID, dimensions, weight, and cost.
Those item definitions become the pack logic your warehouse uses on every order. Instead of leaving choices to whoever is on shift, the WMS applies the right materials automatically.
Assign IDs, versions, and approved pack configurations
Create version numbers for every approved pack configuration. If you use seasonal designs, give them their own version numbers, set retirement dates, and separate old stock so it doesn't slip into January shipments with the standard design.
Each approved version should link to a photo SOP that shows the finished pack. Include:
- product placement
- tissue fold
- insert position
- tape placement
- label location
That image gives packers a clear reference and cuts down on guesswork across shifts. It can also shorten training time.
Set pack rules by order type and shipment needs
Write fixed pack rules for each order type. For example, fragile parcel orders use box A, insert B, and a set amount of dunnage. Premium orders use a rigid mailer with the required inserts. Campaign orders add extras only when the campaign tag is present.
This keeps packing consistent. It also helps the team avoid those small judgment calls that turn into messy variance later.
Document label placement and scan requirements
Set clear rules for label placement, scan checkpoints, and final verification. Put shipping labels on a flat surface with no seam underneath. Then require scans for the pick location, item SKU, packaging component ID, and sealed parcel label.
That scan trail gives the WMS a full record of what went into each box and which label went on it. If a customer reports a packaging issue, you can trace it back fast instead of piecing the story together after the fact.
Once the rules are set, load them into the WMS and mirror them at each packing station.
2. Build the workflow inside the 3PL
Once the pack rules are in place, bring them into the warehouse workflow so every order follows the same path from import to pack-out. Start in the WMS, then match that setup at each packing station.
Load packaging logic into the WMS and packing stations
Each order that enters the WMS should resolve to one pack profile before a packer ever sees it. That profile should include the component IDs, kitting steps, label rules, and QA checks tied to that order type. At the pack station, the profile should show up as a clear step-by-step screen: which box to grab, which inserts to add, and which scans to complete, in order. The packer just follows the screen.
Special instructions should live in coded pack profiles, not buried in free-text notes. For example, an order tag like VIP-CUSTOM-BOX should map straight to a WMS pack profile such as PACK_PROFILE=VIP_BOX_V2, so the right station workflow loads on its own. That cuts out guesswork and helps peak-season temp staff follow the same process as seasoned team members.
With the pack screen set, the next job is to split standard orders from special-pack work.
Separate standard orders from special-pack orders
When complex custom orders get mixed into standard pick waves, throughput drops fast. Classify each order at import - standard, gift, promo bundle, influencer kit, fragile - and send each type to the right lane or batch. Standard orders should run in large, fast-moving waves. Special-pack orders should move in micro-batches of 10 to 50 orders, grouped by complexity so the station setup stays the same across that block of work.
Run special-pack batches on a fixed schedule - say, every hour - so labor planning stays predictable and standard fulfillment keeps moving between those windows. If an order breaks the rules entirely, like a missing pack profile, insert stockout, or data mismatch, the WMS should flag it with a reason code and route it to a dedicated exception lane staffed by a lead instead of slowing down the main queue.
Once orders are routed the right way, the station layout has to make pick, pack, and verification fast.
Set up stations for fast access and verification
A good station setup means no one wastes time hunting for supplies. Keep the most-used boxes and inserts within arm’s reach, about 30 to 54 inches high. Tape, scanners, and label printers should stay in the same spot at every station so packers can switch stations without having to relearn the layout. Shadow boards and color-coded bins help keep supplies where they belong when things get busy.
The point of station setup is simple: stop pack-out errors before they scale. Use layered verification. Scanners should confirm each SKU and packaging component, and a connected scale should check the pre-seal weight against the expected range. If the weight falls outside tolerance, the screen should prompt a re-check before the packer can move on. That way, errors get caught before the shipment leaves the station.
After the station is set, the warehouse still needs tight receiving and replenishment control to protect pack accuracy.
3. Manage warehouse handoff and packaging inventory control
Station setup only works when the right materials are there before orders hit the pack station. That means the process starts at receiving, not at packing. If the wrong packaging version gets checked in, labeled badly, or sent to the wrong area, even the best pack rules fall apart fast.
Set inbound requirements for packaging suppliers
Every packaging supplier should get a written inbound spec before the first shipment shows up. No guesswork. No "we usually do it this way."
That spec needs to cover four things:
- ID
- Count
- Handling
- Documents
Each carton and pallet should have a clear label with the packaging SKU, version number, lot or production run, and unit count. Mixed-version cartons should be banned outright.
Suppliers should also send an advanced shipment notification (ASN) before delivery so the 3PL can pre-stage receiving. Carton barcodes need to match WMS item IDs so the team can use scan-based receiving. It's also smart to set a max carton weight of 40 to 50 lbs for manual handling. These rules cut receiving time and help stop outdated seasonal packaging from slipping into live orders after a promotion ends.
That kind of control at the dock keeps bad stock from reaching the pack floor in the first place.
Check counts, damage, and version accuracy at receiving
Receiving isn't just about counting boxes. It's a quality gate.
When a packaging shipment arrives, the team should compare physical counts against the packing list and ASN using scan-based receiving. Then they should spot-check 1–2 cartons per pallet to confirm the stated units per carton. After that comes a condition check. Look for crushed corners, water staining, scuffed print, or torn wrap. Any pallet with visible transit damage should go straight to quarantine, not into storage.
One receiving mistake can snowball into reships, restocking work, and expedited freight.
Version control comes next. Carton labels should be matched against the approved spec in the WMS or packaging master file against the approved pack profile. If a new version is arriving for the first time, put it in a pending QA status and run a first-article approval. Sample 20 units with actual products and inserts, then confirm dimensions, print, barcode readability, and pack compatibility. Only after that signoff should the WMS status change to available for production. If there's any issue with count, condition, or version, open a nonconformance report with the supplier and block that material from live orders until the issue is fixed.
Control storage locations and replenishment rules
Each packaging SKU and version should have its own dedicated storage location in the WMS. Never share that location with another version. Bulk corrugated stock should sit on labeled pallet racks with aisle-bay-level identifiers, while active pick stock stays in forward pick areas near pack stations. Physical bin labels need to show the packaging SKU, version, description, and a human-readable bin code that matches the WMS exactly. Clear signs such as "Holiday 2026 Boxes – v2 – Use Through 12/31/2026" help stop workers from grabbing the wrong version during peak volume.
Replenishment rules should set a minimum and maximum for each packaging SKU at every station. Once stock drops to the minimum - for example, 50 units of a standard branded box - the WMS should trigger a pull task from bulk storage. Every replenishment move should be scan-verified. The worker scans the bulk location, the packaging SKU and version, and the destination station. When a new version launches, old stock should either be used up during a controlled window with clear SOPs or quarantined and removed from station bins before the new stock arrives. Giving ownership to a named team or shift lead helps keep replenishment tight and cuts last-minute substitutions that break pack rules.
With inventory under control, the next step is pack-out checks that catch errors before sealing.
4. Add pack-out quality checks to protect order accuracy
Once packaging inventory is under control, pack-out checks make sure the right materials end up in the right order before the carton is sealed. At that stage, the packaging is already in place. The last checkpoint is pack-out verification.
Verify picks and packaging components before sealing
Before sealing, the packer should confirm that the live scan matches the WMS pack profile for that order. For kits, marketing bundles, and limited-time promos, set up explicit pack configurations in the WMS with required scans for each insert or gift item instead of relying on free-form special instructions.
Each promo build should also have a version or date range locked in the system so outdated inserts or boxes can't be scanned into a live order. That kind of tight pack-out control cuts down on downstream rework.
After the scan match, use a weight check to confirm the carton is complete.
Use weight, count, and visual checks at pack-out
Weigh every packed carton before label print, and stop release when the weight falls outside the allowed tolerance. Label print should release only after the weight check passes.
Then add a final visual check for:
- Box type
- Insert placement
- Fragile-item protection
If a pack fails any of these checks, it should go to rework, not the shipping line.
Route failed packs to rework and track accuracy metrics
When a carton fails scan, weight, or visual checks, mark it as failed in the WMS and route it to rework. In the rework zone, trained staff should recount contents, rescan items and packaging, fix the issue, reseal the carton, and re-weigh it.
After rework, the order needs a second scan-and-weight sign-off before release.
Track these metrics on a regular basis:
- Order accuracy rate
- First-pass yield
- Mis-pick rate
- Exception rate per 1,000 orders
- Damage rate
Those numbers give both the brand and the 3PL a clear view of where custom packaging workflows are doing the job - and where they break down.
5. Validate the launch and refine the process
Once pack-out checks are steady, put the whole workflow through a live-like test.
Run sample builds and approve photo-based SOPs
Run a pilot with production materials across 3–5 core SKUs and multiple shifts. For each configuration, process 50–200 orders, spread across at least 2–3 different packers. That spread matters. It shows whether the pack rules, warehouse workflow, and accuracy checks built earlier still hold up when the work moves beyond one experienced operator.
Before volume ramps, require brand approval of finished-pack photos. Only approve rollout after pilot accuracy hits 99.5% or higher. Rework during the pilot should stay near zero.
Once the pilot passes, freeze the configuration and block ad hoc changes.
Lock revisions before full rollout
Freeze the approved configuration in the WMS before launch. Send every proposed change through a formal change-control process: impact review, testing, and re-approval before anything goes live.
Also, stop floor-level material swaps by tying material issue and pick logic straight to the approved configuration in the WMS. Restrict those fields to central admin roles. If the brand runs across multiple US distribution points, use the same approved configuration version at every site. Local changes break standardization.
Use the first 30–90 days to confirm the workflow still holds at scale.
Conclusion: Scale branded fulfillment without losing control
These five steps build on each other in a clear sequence. Start by defining packaging components with clear IDs and pack rules. Then turn those rules into warehouse workflows loaded into the WMS and packing stations. From there, control inbound packaging inventory with strict receiving standards and replenishment logic. Check pack-out accuracy with layered scan, weight, and visual checks. After that, validate the full process through a pilot before full volume goes live.
Track accuracy, rework, damage, and return reasons during the first 30–90 days.
FAQs
How does a WMS reduce custom packaging errors?
A WMS cuts custom packaging errors by controlling the workflow from start to finish. It gives teams SKU-level visibility, real-time inventory updates, and automated handoffs across receiving, storage, picking, packing, kitting, and shipping.
It also enforces set work orders and BOM/kitting rules. On top of that, barcode scanning and verification help catch wrong items, bad labels, missing components, and skipped steps before boxes are sealed. Quality control checkpoints and audits help keep order accuracy high, even as volume grows.
When should a 3PL use separate lanes for custom orders?
Use separate lanes for custom orders when your mix includes complex bundles, promo kits, or variable configurations, and you start seeing errors or capacity strain as volume goes up.
The aim is process control. Dedicated staging areas and clearer work cells make it easier to track components from receiving through barcode checks and assembly, so kits keep moving even when demand spikes or schedules change.
What should be tested before a custom packaging launch?
Before you launch custom packaging, test the materials and the workflow to make sure they fit your brand and hold up during shipping.
Put the packaging through real shipping conditions, not just a quick in-house check. Sample incoming components to catch shortages or defects early. Validate assembly against an established gold standard so each packout stays consistent. And before you scale, review the data on how personalized bundles and inserts perform.
That extra testing step can save a lot of headaches later - damaged shipments, missing parts, and packouts that don't match what customers expect.
Related Blog Posts
Related Articles

Real-Time Delivery Visibility for 3PL: Guide

3PL Mispick Prevention: Best Process Checks